Import 4K videos to Sony Vegas Pro 11/12/13
Maybe you have got a 4K camcorder and chances are that you have taken up the instantaneous which the camcorder pats to like when traveling with your friend or family and you want to get all your recorded 4K videos into Sony Vegas Pro 11/12/13 for editing. To get the job done, you may have to put your 4K files into right format/resolution that's compatible with Sony Vegas. Keep on reading to learn details.
First, Learn why Sony Vegas not support 4K videos
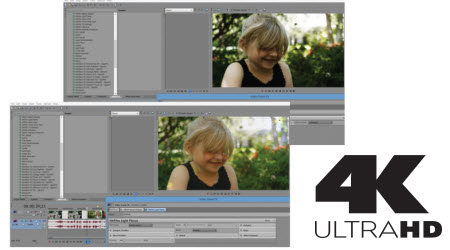
Although Sony Vegas Pro 12 and the latest version Vegas Pro 13 announced that they support a complete 4K workflow when you're working with 4K XAVC and XAVC S, people still encounter many problems when importing 4K videos to Sony Vegas for further video editing.
To eliminate this confusion, first we should check out the roundup of 4K Video File Formats:
1. XAVC: XAVC is a recording format that was introduced by Sony on October 30, 2012. XAVC uses level 5.2 of H.264/MPEG-4 AVC which is the highest level supported by that video standard. XAVC is also a 4K video file format which can support 4K resolution (4096 × 2160 and 3840 × 2160) at up to 60 fps with 4:2:2 chroma subsampling at 600 Mbit/s. On April 7, 2013, Sony announced that it had expanded XAVC to the consumer market with the release of XAVC S. For example, Sony FDR-AX100, FDR-AX33 4K Ultra HD consumer camcorder, Sony HDR-AS100V action camera, etc. all uses XAVC S allowing you to record 4K videos.
2. MTS/M2TS: MTS/M2TS is a file name extension used for the Blu-ray Disc Audio-Video (BDAV) MPEG-2 Transport Stream (M2TS) container file format. This container format is commonly used for HD video on Blu-ray Disc and AVCHD. MTS is developed by Sony and Panasonic together as the recording format for the HD camcorders, commonly the 4K video recorded by the trending Sony, Canon, Panasonic 4K cameras or camcorders is in MTS format.
3. AVCHD: AVCHD (Advanced Video Coding High Definition) is a video format designed for high definition camcorder. It uses a disc structure designed for Blu-ray Disc standard compatibility. Sony, Panasonic, Canon, JVC all produced some high-end HD camcorders including some best 4K camcorders enabling you to record 4K UHD video file in AVCHD format.
4. MXF: Material Exchange Format (MXF) is a container format for professional digital video and audio media defined by a set of SMPTE standards. Many HD camcorders like Canon C500, Panasonic P2 can record 4K video files in MXF format.
5. MKV: MKV (Matroska Multimedia Container) is another 4K video file format with HEVC/H.265 codec. It is an open standard free container format that can hold an unlimited number of video, audio, picture, or subtitle tracks in one file. In other words, it is a multi-track video file format. Microsoft Windows 10 has already added native MKV and HEVC codec support, so you can play your recorded or downloaded 4K videos on Windows 10 PC now.
6. MP4: Numerous emerging stunning 4K Ultra HD videos from the biggest video-sharing site YouTube give us amazing visual feast. You may watch 4K videos online or free download those sharp 2160p videos from YouTube for offline watching to avoid long time buffering. Usually the downloaded YouTube 4K video file format is MP4 (AVC) in 3840 X 2160 pixels.
Though Sony Vegas Pro 12/13 can be taken as native 4K XAVC editor, it refuse to read other 4K video formats like 4K MTS/M2TS, 4K MXF, 4K AVCHD, 4K MKV, which are excluded from the Sony Vegas compatible format list.
Sony Vegas Pro 13 Suppported File Formats
Opens:
MOV, WMV, H.264, AA3, AAF, AIF, ASF, AU, AVC, AVI, BMP, BWF, CDA, DIG, DLX, DPX, DV, EXR, FLAC, GIF, HDP, IVC, JPEG, AVCHD, M2T, M2TS, MVC, Sony MXF (XDCAM and HDCAM SR), MP3, MP4, M4A, MPEG-1 and MPEG-2 video, OGG, MPO, OMA, Panasonic MXF (DVCPRO, AVC-Intra) PCA, PSD, QT, R3D, PNG, SFA, SND, TIFF, TGA, W64, WAV, VOX, WDP, WMA, XAVC Intra MXF, XAVC S
Saves:
H.264, AA3, FLAC, AC3, AIF, ATRAC, AVC, AVCHD, AVI, DPX, EXR, HDP, MOV, MP4, WMV, MP3, MPEG-1 and MPEG-2 video, M2T, Sony MXF (XDCAM and HDCAM SR), MVC, OGG, Panasonic MXF (AVC-Intra), PCA, W64, WAV, WMA, XAVC S, XAVC Intra MXF
DVD Encoding:
Video: NTSC 4:3, NTSC Widescreen, PAL 4:3, PAL Widescreen
Audio: AC-3 5.1 or stereo, PCM
Blu-ray Encoding:
Video: MPEG-2 or AVC, 1080-60i, 1080-50i and 1080-24p
Audio: AC-3 5.1 or stereo, PC
Format I/O and Hardware Support
- Support for XDCAM essence markers
- Capture directly to XDCAM-compatible MXF files from supported SD/HD-SDI sources
- AVCHD timecode support
- Read and save DPX, OpenEXR, and Microsoft HD Photo formats
- NVIDIA 3D Vision Support
- Genlock controls for synchronizing AJA video device output to a reference signal
- Streaming Support for rendered AVC/MP4 files
- Support for 4K XAVC and XAVC S files
- Panasonic P2 Support
- Blu-ray rendering support with MainConcept AVC plug-in
- HDCAM SR (SStP) Mastering
- Support for AVCHD 2.0 Standard
- Support Metadata Orientation Information for Still Image Formats
- GPU Accelerated Performance
- GPU Acceleration for 'Titles & Text' Plug-in
- Comprehensive XDCAM Optical Media support, including full proxy workflow
- Export directly to PlayStation Portable devices
- AVC/AAC support
- MPEG-1, -2, and -4 support
- ATRAC 3 input and output
- MPEG-2, Insert I-Frame at markers
- Support for the Microsoft Image Mastering API (IMAPI) disc drivers
- External control surface support
- AJA and Blackmagic Design hardware support
- Application scripting for task automation
- QuickTime format support, with optimized AVC decode, for DSLR formats
- Subtitle time/text export to DVD Architect Pro software
- Red Book audio CD production
- Exports chapter markers and subtitles to DVD Architect Pro 6.0 software
Sony Vegas Pro 12 Suppported File Formats
Opens:
AA3, AAF, AIF, ASF, AU, AVI, BMP, BWF, CDA, DIG, DLX, DPX, DV, EXR, FLAC, GIF, HDP, IVC, JPG, M2T, M2TS, MOV, Sony MXF (XDCAM and HDCAM SR), MP3, MP4, M4A, MPEG-1 and MPEG-2 video, OGG, OMA, Panasonic MXF (DVCPRO 25, 50, 100, AVC-Intra 50, 100), PCA, PNG, PSD, QT, R3D, SFA, SND, TIFF, TGA, VOX, W64, WAV, WDP, WMA, WMV
Saves:
AA3, AC3, AIF, ATRAC, AVC, AVI, DPX, EXR, FLAC, HDP, MOV, MP3, MPEG-1 and MPEG-2 video, MP4, M2T, Sony MXF (XDCAM and HDCAM SR), OGG, PCA, W64, WAV, WMA, WMV
- DVD encoding, Video: NTSC 4:3, NTSC Widescreen, PAL 4:3, PAL Widescreen
- DVD encoding, Audio: AC-3 5.1 or stereo, PCM
- BD encoding, Video: MPEG-2 or AVC, 1080-60i, 1080-50i and 1080-24p
- BD encoding, Audio: AC-3 5.1 or stereo, PCM
Extensive Capture and Export Support
- Edit XDCAM, AVCHD, NXCAM, RED ONE and EPIC, HDCAM-SR and Panasonic P2 media natively, with no transcoding or re-wrapping
- Supports Digital SLR workflows using h.264 Quicktime files or AVCHD recording
- Encode to HDCAM-SR for pristine archiving and mastering
- MainConcept AVC encoder supports variable bit rates up to 40 Mbps and average bit rate of 25 Mbps
- MP4 encoding with progressive download function, enablingvideos to begin playing while downloading
Worse still, working with 4K files can be taxing on your computer, especially if you don't have the most powerful machine to edit on. From our tests it looks like Sony Vegas Pro 12/13 has to create a lower resolution proxy file to display in the NLE while you edit, so you have to wait for the proxy file to be created before you can edit any 4K footage. In this process, it will cost some time.
Two Easy Methods to let Sony Vegas work with 4K videos
In order get rid of the trouble that some 4K videos won't be edited with Sony Vegas Pro 11/12/13, you are here offered with two easy methods to let Sony Vegas work with 4K videos as below.
Method One: Render 4K Video with Sony Vegas Pro
Part 1. Setting up the Project
1. Turn on GPU acceleration.
If you have a compatible graphics card installed, you can use it to help speed up your rendering time and offload some of the process from your CPU. Click Options and select Preferences from the bottom of the menu.
- Click the video tab.
- Click the drop-down menu next to "GPU acceleration of video processing" and select your graphics card. If your video card is not supported, it will not appear in the menu.
- Click Apply and then OK to close the window.
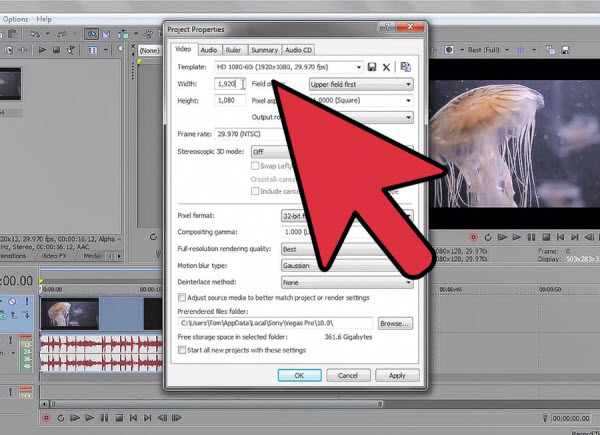
2. Open the Project Properties window.
You can open this window by clicking the Project Properties button above the preview pane, or by clicking File → Properties. This will open a new window which will allow you to adjust all of the details of your project.
- You can set the project properties before you start editing your video.
3. Select a template.
At the top of the Video tab, you will see a Template drop-down menu. There will be a large list of templates to choose from, but if you are rendering in 4K there are only a couple you need to pay attention to.
- If you are filming in NTSC (North America), select "HDV 720-30p" for 720p or "HD 1080-60i" for 1080p.
- If you are filming in PAL (Europe), select "HDV 720-25p" for 720p or "HD 1080-50i" for 1080p.
- The main difference between NTSC and PAL is the framerate (29.970 vs. 25).
- If you are shooting at a higher framerate than NTSC or PAL standards, such as 60 fps, choose the appropriate template for the resolution you want.
4. Change the field order.
If you are rendering 1080p video, you will want to change the field order for your frames. Click the "Field order" drop-down menu and select "None (Progressive scan)". This will result in smoother video.
5. Check the rendering quality.
After selecting your template, look for the "Full-resolution rendering quality" drop-down menu. Ensure that it is set to "Best".
6. Select the deinterlace method.
Most modern digital footage is shot in progressive mode, so there is no need for deinterlacing. Click the drop-down menu and select "None". Any other method could result in unwanted scanlines in the final video.
- If you are rendering in 1080p, select "Blend Fields" as most 1080p footage still uses interlaced frames.
7. Check the "Adjust source media..." box.
This will help reduce the chance of small black bars appearing around the edge of your finished product.
8. Save your template.
Once you are finished configuring your custom template, you can save it for easy access later. Enter in a name to help you remember it into the Template field, and then click the Save button. Your custom template will be added to the list, allowing you to quickly select it again.
9. Click the Audio tab.
Here you can adjust your audio settings for your project. There are a few things you'll want to check in order to ensure the best-sounding video possible.
- Sample rate (Hz) - This should be set to 48,000, which is DVD quality.
- Resample and stretch quality - This should be set to "Best".
Part 2. Rendering the Video

1. Open the "Render As" menu.
Now the your project properties have been set, you can choose how you want to render it for the final product. You can find the "Render As" button in the toolbar or in the File menu.
2.Select an output format for 4K video
In the "Render As" menu, you will see a list of available formats in the Output Format section. There is a lot of discussion about which formats work best, but in general there are three formats that are considered the best for 4K video:
- MainConcept AVC/AAC (*.mp4;*.avc)
- Windows Media Video (*.wmv)
- Sony AVC/MVC (*.mp4;*.m2ts;*.avc)
- Main Concept will result in the fastest rendering times if you are using GPU acceleration.
- Sony AVC is the best option for older versions of Vegas.
3. Expand the format you want to use.
For example, if you want to use Main Concept, expand it to display all of the different templates available under that format. Choose the one that matches your video the best.
For Main Concept, if you are making a 720p video, choose "Internet HD 720p". If you are making a 1080p video, choose "Internet HD 1080p".
For Windows Media Video, if you are making a 720p video, choose "6 Mbps HD 720-30p" (NTSC) or "5 Mbps HD 720-25p" (PAL). If you are making a 1080p video, choose "8 Mbps HD 1080-30p" (NTSC) or "6.7 Mbps HD 1080-25p" (PAL).

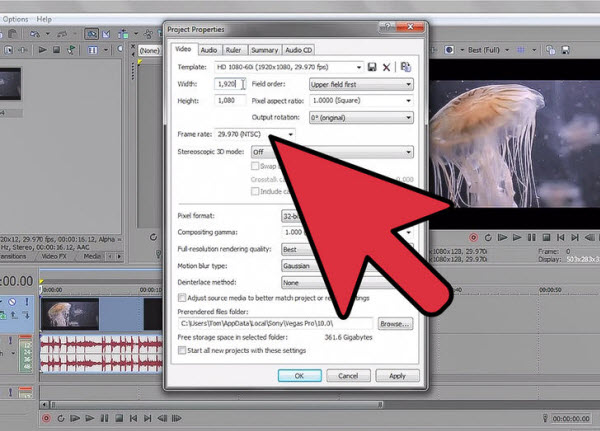
4. Customize the template.
Click the "Customize Template" button to open a new window with all of the template settings. Note: This is different than your Project Properties template, and the following settings apply to MainConcept only.
- Uncheck the "Allow source to adjust frame rate" box. This may help prevent some stuttering in the final project.
- Ensure that the "Frame rate" drop-down menu matches what you set in the Project Properties window.
- Adjust the bitrate for smaller file sizes. If you want the final project to be smaller, lower the average bit rate at the bottom of the window. This will result in a lower-quality video. 720p can go as low as 5,000,000 for the average and 10,000,000 as the maximum.
- Change the "Encode mode" drop-down menu to "Render using GPU if available". This will force the program to use the GPU to help rendering, which can significantly speed up the process.
- If you are using the Windows Media Video format, and are making a 1080p video, check the "Image size" drop-down menu in the Custom Settings window. By default, WMV selects 1440 x 1080, which will result in a skewed image. Set it to "(Keep Original Size)" and then set the "Pixel aspect ratio" menu to "1.000 (Square)".

5. Start rendering.
Once you've set all of your rendering options, it's time to start processing the video. Click the Render button at the bottom of the "Render As" window to begin the process. A progress bar will appear, and you will see the frame counter beneath the preview window advance as the rendering occurs.
- Rendering in 4K can take a significant amount of time. Video length, rendering options, and computer specifications all have an impact on the total rendering time.
Warnings: It takes up a lot of resources to render in 4K, so make sure not to open other programs up, or they'll most likely crash. (See more info)
Method Two: Transcode 4K Videos to Sony Vegas supported formats
Since you may easily have crashing issues during render, any small change you make will make the render process be ended, so you need to re-render. Then render again...and again...and again, while you are working. So another better solution we offered to you is to do 4K to Sony Vegas conversion before you edit.
You can use the best 4K video converter- iFastime Video Converter Ultimate. It saves you both the rending time and annoying incompatible format/codec issue. And all you need is to drag the 4K videos, choose Sony Vegas video format and start 4K video conversion for Vegas Pro. With it, you can transcode 4K video to WMV for easy importing to all versions of Sony Vegas (Vegas Pro 10/11/12/13). Not just 4K videos, this powerful video converter also can convert other SD/HD videos including MP4, MOV, AVI, FLV, MKV, VOB, Tivo, DivX, Xvid, MXF, MTS, XAVC, etc to Sony Vegas Pro, Pinnacle Studio, Windows Movie Maker, PowerDirector, Avid Media Composer, Adobe Premiere Pro and more NLE supported format on Windows (Windows 10 included). What's more surprising is that it can offer many personalized editing functions to edit the 4K videos before or after the conversion. Follow its step-by-step instruction below to learn how to encode 4K video files to WMV for Sony Vegas Pro.
Free Download iFastime Video Converter Ultimate:
Encoce 4K files into Sony Vegas Pro for loading without rendering
Step 1. Add 4K videos to Sony Vegas Pro
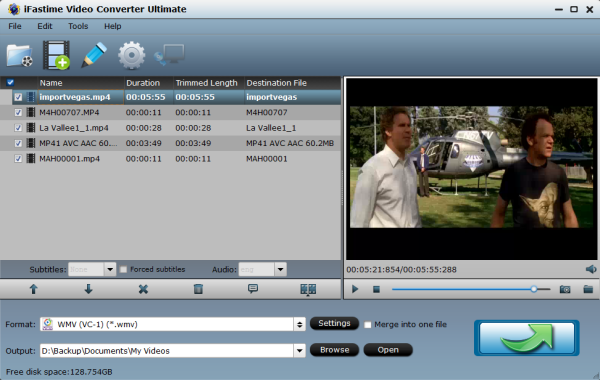
Launch the best 4K videos to Sony Vegas Pro converter. Click "File> Add Video/Audio" button to import 4K files, or directly drag and drop the files into this program.
Step 2. Select Sony Vegas Pro compatible format
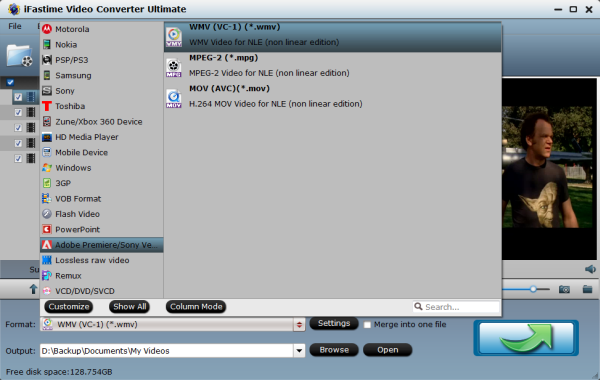
Get the dropdown menu besides "Format" and then move your pointer to "Adobe Premiere/Sony Vegas> "WMV (VC-1) (*.wmv)" as the output format from the profile list which is the Sony Vegas Pro compatible video format. You may also select Sony Vegas supported MPEG-2, AVI or MOV.
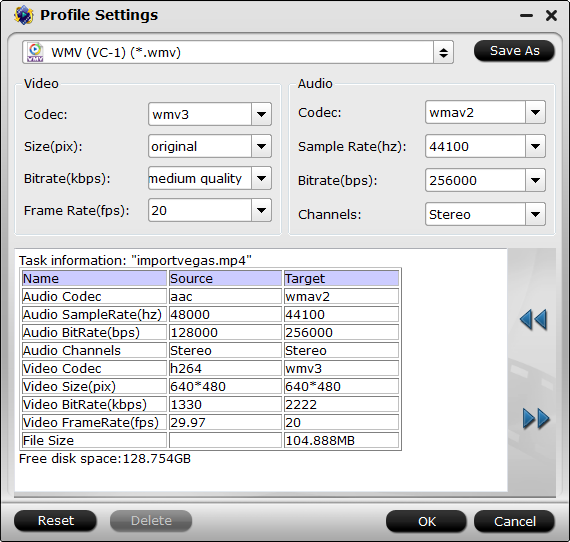
Tip: You can adjust the video and audio parameters, including the Bitrate of Video & Audio, Video Size, Frame Rate, Audio Channels, etc., by clicking the Settings button on the main interface. Generally speaking, you may need to decrease bitrate to make smaller output video size.
Step 3. Start conversion
Click the "Start conversion" button, the 4K video converter will start encoding 4K files to Sony Vegas Pro immediately. After the files are converted, tap the Open button to locate the converted files and bring them into Vegas Pro with best audio and video quality, edit, export or share.
With iFastime Video Converter Ultimate you can easily import all 4K videos into Sony Vegas 08/09/10/11/12/13, Vegas Movie Studio, Vegas Movie Studio Platinum, Vegas Movie Studio Platinum Pro Pack for editing.
And also the following questions will be solved at ease:
Vegas 12 refuses importing some of my 4K files, how to solve this?
Why can't open 4K videos into Sony Vegas? Is there some tool to help make it?
How to import my 4K footage to Sony Vegas 13/12 for editing?
Any
recommended 4K to Vegas Pro video converter? I tried many converters but none of them gets the converting work done.
Have more questions about how to import 4K videos to Sony Vegas Pro 11/12/13, please feel free to contact us>>
