Solve iOS 9 Firmware Upgrade Failure – Recover Lost iPhone Data After iOS 9 Upgrade
As expected, Apple has just released the latest and supposedly greatest version of its mobile operating system to date, iOS 9. We say "supposedly" greatest as it seems not many people are able to get their hands on it just yet to test it out thanks to a "Software Update Failed"error message. Here, in this article, there are some simple tricks if you're running into this problem updating to iOS 9.
How to fix 'Software Update Failed' error
There are two ways we got around the "Software Update Failed" error message when updating to iOS 9 today.
First way: try and then try again.
Apple's servers are currently under a lot of pressure, rolling out today's operating system change to millions of iPhones and iPads worldwide. That's a lot of required bandwidth.
Second way: Manually Download iOS 9 to your iPhone
This requires a USB lightning cable, a computer and iTunes. Manually updating to iOS 9 always works better than over-the-air updates when I have problems getting the fresh coat of paint for my iPhone and iPad. It's the best fix to get your iOS 9 fix right now if you're getting that non-fatal failed update error message.
Sometimes, the iOS upgrade failure may lead to erase all the data on your iPhone. If it happens, how can you recover the erased data from iPhone after iOS 9 upgrade? If you don't know , just read on. The following article can tell you the right way to recover iPhone data after iOS 9 upgrade.
How to recover lost iPhone data after iOS 9 upgrade?
Wondershare Dr.Fone for iOS is one of the top iPhone Data Recovery software. It can recover lost/deleted iPhone data no matter you failed to upgrade iOS 9, accidently deleted your iPhone files, lost all data after failing iPhone jailbreak, or erased all files after factory restore. This iPhone Recovery supports recover almost all lost data from iPhone, iPad, iPod Touch including messages, call Logs, contacts, notes, WhatsApp history, Safari Bookmark as well as Calendar and so on.
Free Download or Purchase iFastime Video Converter Ultimate
Method 1: Recover Lost iPhone Data Directly
Method 2: Retrieve Erased iPhone Data from iTunes Backup
Method 3: Recover Erased iPhone Data from iCloud Backup
Method 1: Recover Lost iPhone Data Directly without Backup
Step 1: Connect your iPhone to computer
Connect your iPhone to computer and run the iPhone Data Recovery program on your computer. After connecting your iPhone, you need to click the "Start Scan" button to scan your iPhone. You'll see this scanning window immediately after clicking the "Start Scan" button.
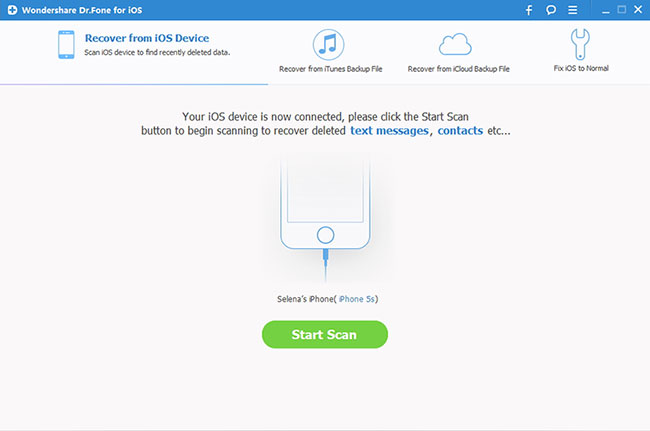
For iPhone 4 and iPhone 3GS users, you can choose to go to the Advanced Mode to get a deeper scan for your iPhone. Just click on the button at the lower right-corner.
Step 2: Enter the device's scanning mode and scan it
iPhone 6 Plus/6/5S/5C/5/4S users don't need to do this step. You only need to click "Start Scan" to directly scan your iPhone for lost contacts on it.
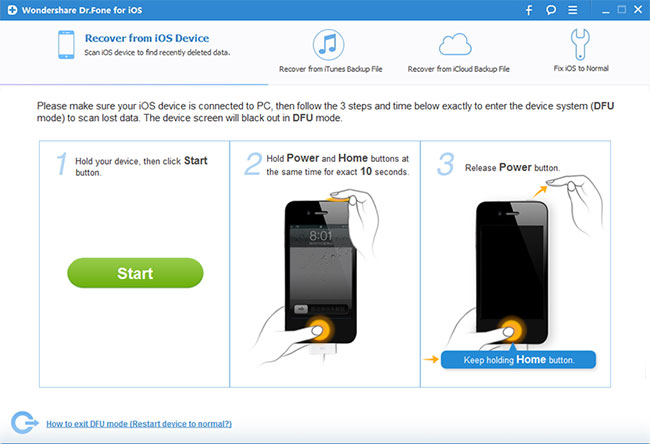
For iPhone 4/3GS users, you need to follow the steps below to enter the device's scanning mode to scan it:
1) Hold your device and click the "Start" button.
2) Pressing the "Power" and "Home" buttons at the same time for exact 10 seconds.
3) Then release the "Power" button, but keep holding "Home" for another 15 seconds until you get the message of successfully entering.
Step 3: Preview and recover lost iPhone data
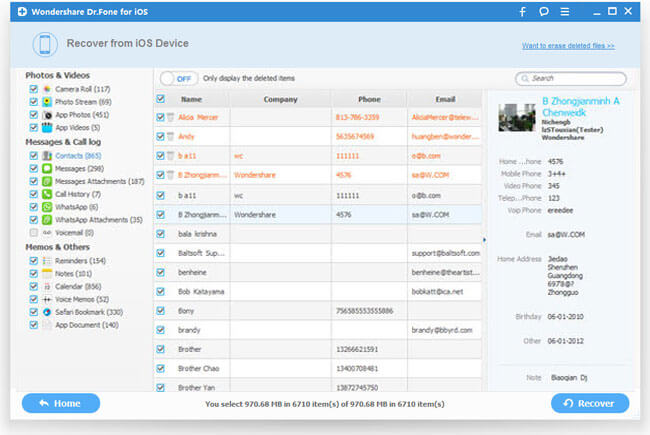
When the scan is finished, you can preview all found data before recovery. Choose the file type to preview, mark it and click the file you want to recover, you can save them on your computer with one click.
The data found here includes deleted data and those still on your iPhone. If you only want back your lost ones, you can refine the scan result by using the slide button on the top to only display the deleted items.
Method 2: Recover Data to iPhone from iTunes Backup
Step 1. Choose "Recover from iTunes Backup File" mode on the software interface. After then, the iTunes backup recovery tool will detect all iTunes backup files on this computer and display them in the window.
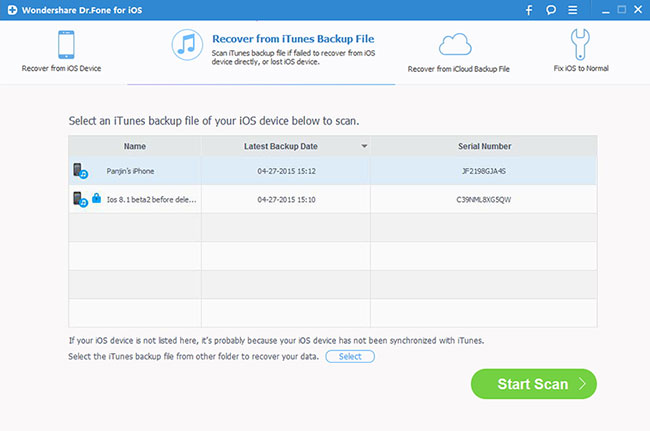
Step 2. Select the iTunes backup file that contains the data you want to recover and click "Start Scan". It will take a few minutes to extract all data from the iTunes backup file.
Step 3. When all data in the backup file is extracted and displayed in categories, you can selectively mark and recover those you want by pressing the "Recover" button at the bottom.
Method 3: Recover Data to iPhone from iCloud Backup
Step 1. Like the step 1 in the method 2, just choose the recovery mode of "Recover from iCloud Backup Files" on the top. Enter your iCloud account and password to login. Wondeshare takes your privacy seriously.
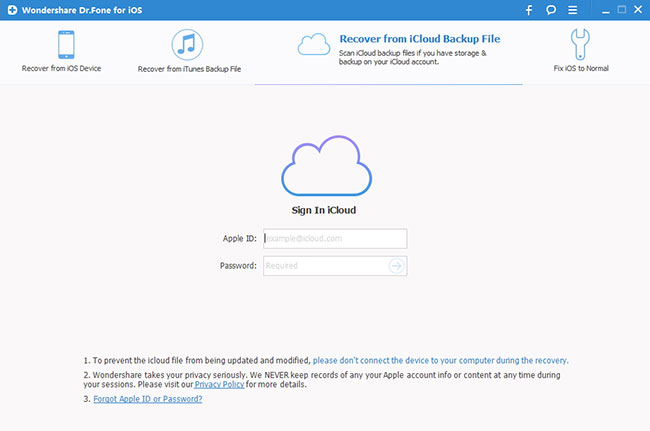
Step 2. When you logged into iCloud, the program can find all iCloud backup files in your account. Choose the one where you're going to recover data and click on the "Download" button.
Step 3. Once scan process stops, you can preview almost all data in your iCloud backup file, like contacts, messages, photos, and more. Check them one by one and tick the item you want. Then click on the "Recover button" to save them on your computer with one click.
Related Software:
Wondershare MobileTrans: This software allows you to transfer content between Android, iOS and Symbian smartphones, no matter which network they run on, as long as you use a PC as a go-between.
Wondershare Dr.Fone for Android: This program can make you get back lost Android Phone data no matter whether you lost them by restoring factory settings, deleting, flashing ROM or rooting.
Wondershare TunesGo: TunesGo is a powerful Music Transfer tool which enables you to drag and drop your desired music files/playlists from any devices to another, and manage, discover and share your music with ease.
iFastime Video Converter Ultimate: With the product, you can transcode copy-protected Blu-ray/DVD, 4K/SD/HD video in any format to iPhone 6S/6S Plus, iPad Pro, iPad Mini 4, etc supported formats.
Have more questions about how to fix iOS 9 failure upgrade and recover lost iPhone data, please feel free to contact us>>
.Related Articles
One thought on “Solve iOS 9 Firmware Upgrade Failure – Recover Lost iPhone Data After iOS 9 Upgrade”
Leave a Reply
You must be logged in to post a comment.

Great article