Move media content to iPhone 7/SE/6S Plus/6S from PC/Mac
The iPhones have hit the market with record popularity, and many people choose iPhone as one of their needed portable devices due to the built-in powerful functions, retina display, and exceptional mobile movie experience. Troubled in having no idea on how to transfer files from computer to your iPhone (7/SE/6S Plus/6S) for enjoying conveniently including its supported and unsupported video formats? Fortunately, the article is an attempt to teach you how to move media content to iPhone 7/SE/6S Plus/6S from PC/Mac. All your trouble is over after reading the following paragraph!
Issues Occurring When adding local media content to iPhone:
I usually watch videos on the internet on my iPhone 6S but one day it just started saying sorry this video cannot be played. How can i get it to work again?
I am trying to put an HD 720p mkv on my iPhone 6S Plus, but for some reason windows tells me to convert it or it wont play right. I'd like to know how to put unsupported mkv onto my iPhone 6S Plus.
I want to preorder an iPhone SE, and presumably due to issues with my computer I can not transfer files between the two via cable, how can I move files between my iPhone SE and my computer?
Part 1: Supported Video Formats of iPhone (7/SE/6S Plus/6S)
Based on previous experience, iPhone video formats present the major obstacle when users want to put own movies and videos to their iPhone 7/SE/6S Plus/6S/6/6 Plus/5S/5C/5/4S/4/3GS, etc. To enjoy all SD, HD and 4K videos, movies, TV shows, Blu-ray, DVD discs on iPhone (7/SE/6S Plus/6S), let's have a look at the video formats for iPhone devices in this article first.
Part 2. Transfer Video to iPhone (7/SE/6S Plus/6S) in Supported Formats
1. Transfer video from PC to iPhone 7/SE/6S Plus/6S
a. Via iTunes
- Plug iPhone into computer via the USB cable. iTunes will launch automatically, if not, manually start it on your computer.
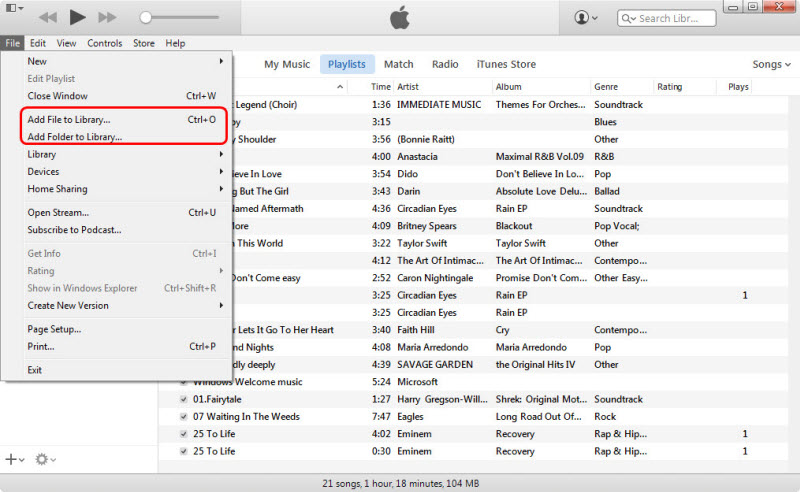
- Click "File > Add Files to Library" at the upper left corner of the window. Then select the video files on your computer and add them to the library.
- Click the iPhone icon in iTunes and choose Movies Library in the left sidebar. Then check Sync Movies and click Apply. iTunes will then sync movies to your iPhone.
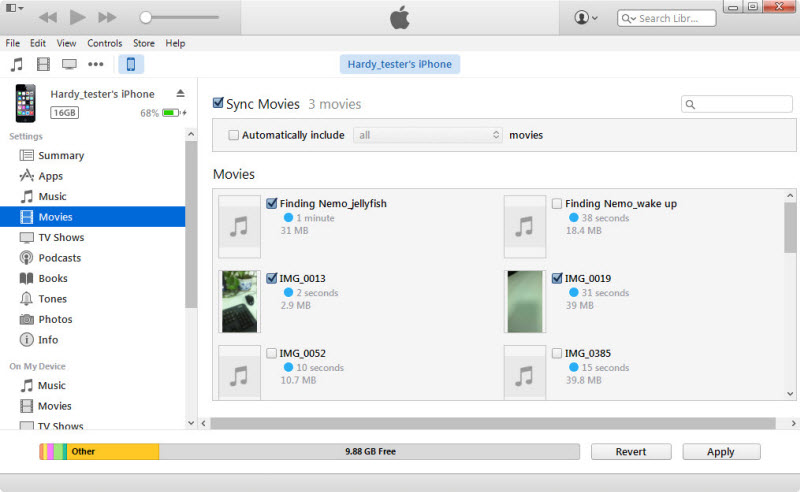
With iTunes, users are able to get videos to iPhone (7/SE/6S Plus/6S) easily.
b. Over Wi-Fi
I'd say VLC is the best option for syncing and playing video files on iOS devices because not only is it free based on an open source project, but it will basically play any kind of file you throw at it. Yes, even on the iPhone.
- To transfer the video file you'll first need to make sure both your computer and the iOS device are on the same Wi-Fi network.
- Then open the VLC app on your iPhone, and tap the red traffic cone icon we've come to adore over all these years.

- From the sidebar tap the "Sharing via WiFi" button.
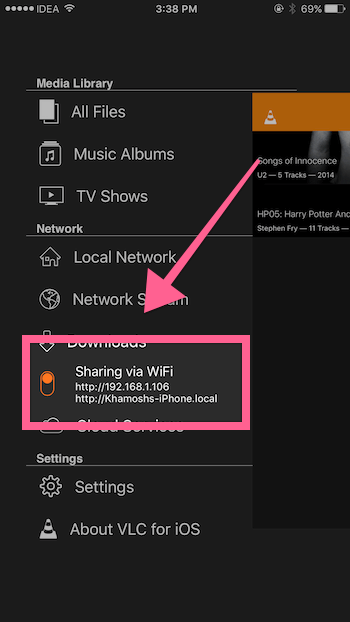
- It will now change to show an IP address and a ".local" address.
- Go to your PC, and in a modern browser like Chrome, type in either of those addresses in the URL bar.
- This will take you to a page where you can either select the video files you want to transfer using the "+" icon or just drop in the files.
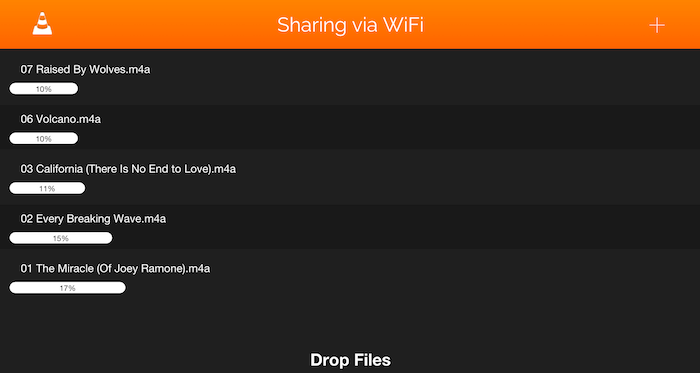
- One interesting thing about this feature is that it even allows you to transfer any file from the VLC app on the iOS device to your desktop as well.
Note: VLC is chock-full of ways to transfer files to the app. You can use the iTunes app, connect to any server on the PC (Including Plex) or just copy any file from a locally-shared network. I've used the Wi-Fi method here because it's the most accessible and easiest to use.
c. Take advantage of Dropbox
- Install Dropbox on your PC and iPhone. Create an account and then you will get 2GB for free.
- Open Dropbox on your computer and copy the videos into the folder of the app.
- Tap to start Dropbox on your iPhone, and then you will get the videos within the app. Sometimes you may have to wait for a while as the sync process may take a second, especially you have got large files to sync with iTunes.
Dropbox gives you 2GB for free, and if your video files are not that large, you can make full use of this app. Note that only with the same account can you sync videos from PC to iPhone with Dropbox.
2. Transfer video from Mac to iPhone 7/SE/6S Plus/6S
a. Via iTunes
STEP 1. Add videos to iTunes
Launch iTunes and click iTunes File menu > Add to Library to browse your computer for the videos that you want to transfer from Mac to iPhone and add them to iTunes Library.
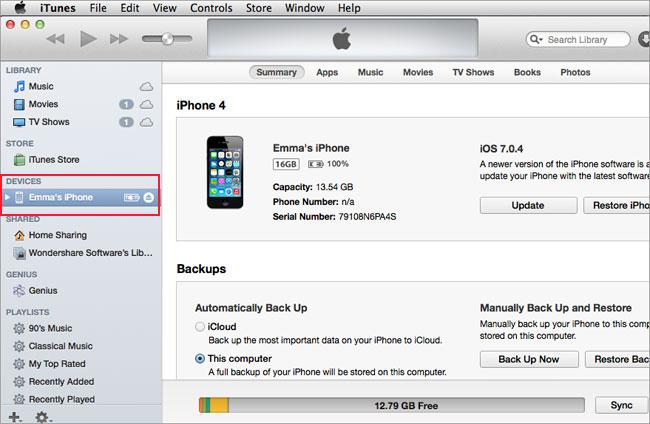
STEP 2. Connect iPhone with Mac
Use your USB cable to connect iPhone with Mac. Click iTunes View menu > Show Sidebar. After that, by default, you can see your iPhone is under DEVICES in the sidebar. Click your iPhone icon. And then on the right side of window, you can see the Movies tab.

STEP 3. Stream video from Mac to iPhone
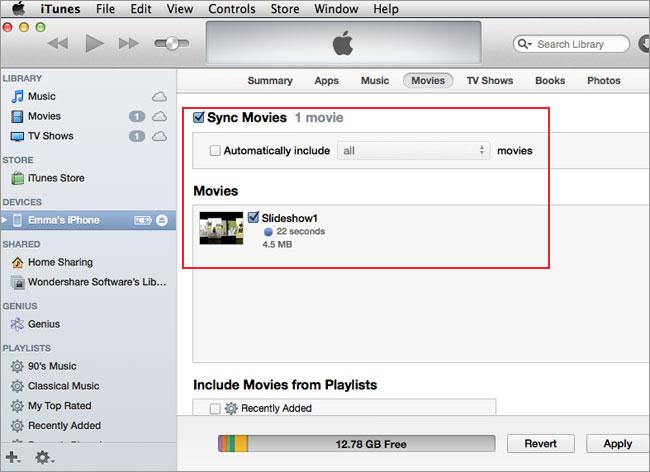
Click the Movies tab on the right side of iTunes Windows. And then check the option Sync Movies. And then you can see that the videos you've added to iTunes Library beforehand appear in the Movies area. Check needed ones and click Apply to transfer videos from Mac to iPhone.
b. Use Wi-fi transfer
Step 1: Connect iPhone to the same Wi-Fi network as the Mac. You do not need to use the USB cable, or iTunes. It is wireless transfer between Mac and iPhone.
Step 2: Run Wi-Fi transfer app on iPhone
You can download the iPhone video transfer app from below link:
http://itunes.apple.com/us/app/wireless-transfer-app/id543119010?ls=1&mt=8
It supports iPhone 5, iPhone 4S, iPhone 4, and iPhone 3GS running on iOS 5, iOS 6 or iOS 7.
Step 3. Open web browser on Mac
On the Mac end, you can use your desktop browser to download or upload videos between Mac and iPhone.
Step 4. Transfer Video from Mac to iPhone
If you choose to use desktop browser to transfer videos from Mac to iPhone, click the Upload Photos & Videos button to choose video files on your Mac and send to iPhone through Wi-Fi.
Wi-fi transfer is the professional transfer tool for iPhone, iPad and Android devices. It can help you transfer videos from Mac to iPhone safely without affection on other files and data on iPhone. You do not need to worry above erasing your iPhone when you transfer a video from computer to it. Best of all, it is so easy to use and takes no efforts. See the details below.
Part 3: Transfer Video to iPhone (7/SE/6S Plus/6S) in Unsupported Formats
As you see, many popular and widely-used video formats are not in the list of video formats supported by iPhone, like H.265, VOB, Tivo, MPG, etc. This means, in view of the few formats compatible with iPhone (7/SE/6S Plus/6S), you have to first of all convert your videos with formats not supported by iPhone (7/SE/6S Plus/6S).
In this case, you will be in urgent need of a specialized video converter for iPhone, helping you quickly fulfill the task of converting video to iPhone (7/SE/6S Plus/6S). Here, iFastime Video Converter Ultimate is highly recommended to you. This iPhone video converter delivers a seamless conversion from videos like H.265, VOB, Tivo, MPG, MOV, MTS, M2TS to iPhone (7/SE/6S Plus/6S) on Windows PC with top video quality and high efficiency. It let's you target exactly which device you want your videos to play on, with default settings for iPhone. the Therefore, you can transfer and play any video on iPhone (7/SE/6S Plus/6S) as you please.
In addition, the upgraded version can remove latest Blu-ray/DVD protection and rip them to iPhone 7/SE/6S Plus/6S/6/6 Plus/5S/5C/5/4S/4/3GS and even iTunes video formats, remaining all the features and without any video degradation after ripping. Besides the basic functions, this allows you to clip segment you favored, as well as adjust video quality by parameter setting, customize video file size, add subtitles, etc. Now Use the program to instantly broaden your entertainment options with your computer.
Free download iFastime Video Converter Ultimate. The interface is very intuitive and easy to understand.
A Simple Guide On Convert Unsupported Videos For iPhone (7/SE/6S Plus/6S)
Step 1: Add Video
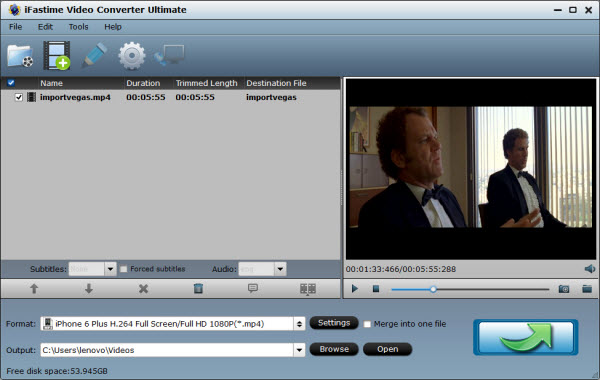
Launch this iPhone video converter and click "Add video" in the main interface to load video files you want to play on iPhone (7/SE/6S Plus/6S). Or simply drag these files into the program. It supports batch convert video to iPhone (7/SE/6S Plus/6S).
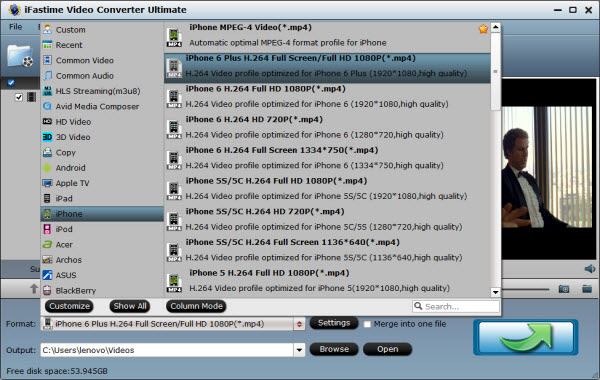
Step 2: Select Output Format
Open the output format list and click "iPhone". Choose the right one according to your iPhone models and set as an output format.
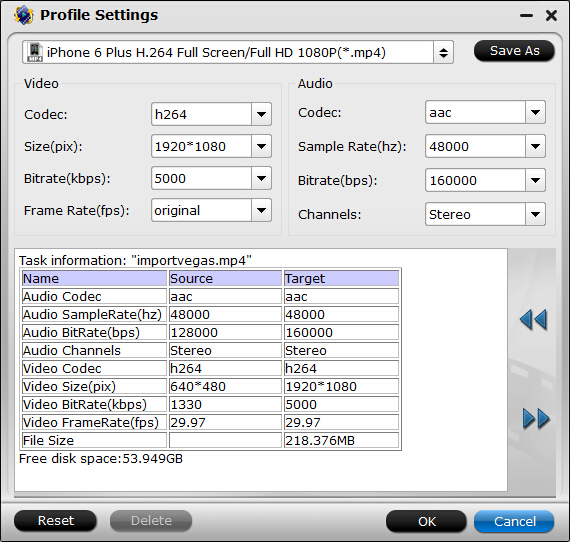
Tip: If you're skilled at advanced settings about video and audio parameters, you're able to customized settings, such as select bitrates, encoders, audio channel and change aspect ratio.
Step 3: Start Conversion
Hit "Start convreson" button, the video converter will automatically convert videos to the format supported by iPhone (7/SE/6S Plus/6S) immediately. Open the output folder and transfer to your iPhone (7/SE/6S Plus/6S) with optimal performance. Besides high quality conversion, this converter can help you achieve more and enjoy life in a better and easier way.
For mac users, please try the mac version convert Unsupported Formats to iPhone (7/SE/6S Plus/6S) for playback on Mac OS X (El Capitan included).
Related Articles:
- iPhone 6S Plus vs Galaxy Note 5
- iPhone 7 vs Galaxy S7, Who Wins?
- Best Flash Player for iPhone 6S (Plus)
- Make Ringtone for iPhone 6S (Plus) for Free
- iPhone 5se VS iPhone 7- 2016 Top iPhone Battle
Have more questions about how to move media content to iPhone 7/SE/6S Plus/6S from PC/Mac, please feel free to contact us>>
