How to extract audio from MP4 for enjoying on MP3 Player
Aug 19, 2015 03:50 am / Posted by Charles Brown
MP4 is a widely-used video format which you can grab off YouTube, Vimeo, and many other online video websites. Isn't it a cool and relax thing that after a tired working day, you can listen to the song you love from a particular MP4 movie with a carry around tiny MP3 player on the way home? Or is it so fantastic that you can backup the background music or dialogue in the MP4 movies you favor on portable players for enjoying when taking family road trips? Although most dedicated music players can handle MP4s no sweat, it's often far easier to convert the MP4 files to MP3 to lighten their footprint and grant the audio greater versatility. Read on to see three different ways to extract MP3 audio from MP4.

First Way- Using iFastime Video Converter Ultimate (Windows/Mac)
After search engine, I find a sound MP4 audio extractor iFastime Video Converter Ultimate which can fulfill all the above requirements with easy-to-use interface, ultra-fast extracting speed and rich audio formats support. It comes with an all-round way to extract audio from not only MP4, but also MP4, MOV, AVI, MKV, MTS, FLV etc, to all popular audios such as MP3, WMA, WAV, M4A, AAC, AC3 and OGG for different digital players with excellent sound quality. And best of all, the third-party utility houses basic options for trimming, layering various audio effects, etc. and supports merging several file into one for outputting can get a long file for uninterrupted listening or adjusting bit rate, sample rate, channels, etc. to get custom music file. If you are Mac users, turn to the mac version here. Get the simple guide on extracting audio from MP4 with the top MP4 audio extractor below!
Free Download or Purchase iFastime Video Converter Ultimate:
Convert MP4 to MP3 format for listening
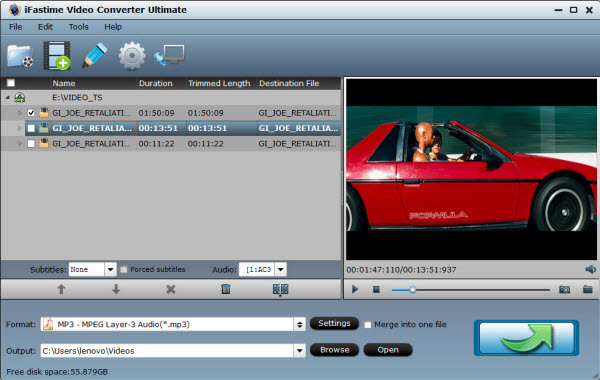
Step 1. Import MP4 files
Click the "Add video" icon to import MP4 files into it, or you can drag-and-drop directly. Then you will find a horn icon on the left that indicates it's an audio file.
Step 2. Choose MP3 Format
Move your cursor to Format and choose "Common Audio > MP3 – MPEG Layer-3 Audio(*.mp3)" as below:
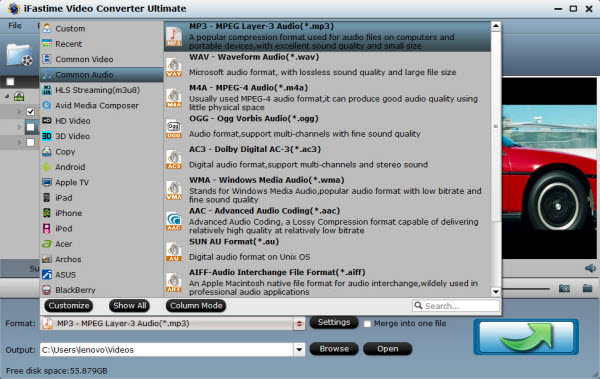
As listed above, there are several presets for other audio format; just choose one as your needs.
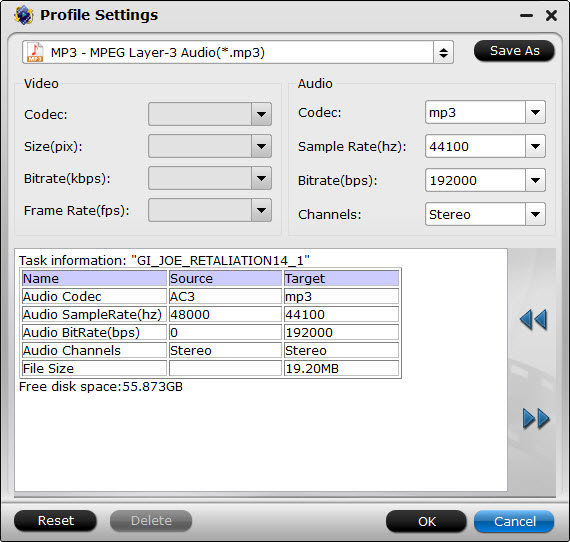
Step 3. Adjust audio specs (optional).
If you are not satisfied with the default audio quality, just click the "Settings" icon and choose wanted audio settings including sample rate, bitrate and audio channel.
Step 4. Start converting MP4 to MP3.
Now back to the main interface and hit "Start conversion" to convert your MP4 files to MP3 format. It will start batch conversion automatically one by one. Wait for a while during the progress; after it completed, click "Open output folder" to locate the converted audio file.
Ok, now your MP4 song has been converted to MP3 which is perfect for MP3-suppported players. Personally, I will choose this way since with it, my popular types of video is capable to be wholly converted to and from, then I can enjoy my media files on DVD Player, TV, Windows Media Player, etc. without limitation.
Second Way- Using VLC Player (Windows/Mac/iOS)
VLC Media Player is not just a media player, it also offers a feature to convert FLV, AVI, and other video files to MP3 format. The process of extracting audio information from video files is outlined below.
Step 1. Open VLC Media Player on your system. Or download it from the official website if you do not have it installed yet.
Step 2. Go to Media > Convert/Save or press Ctrl-R to open the dialog. Select the desired file that you want to convert with a click on the Add button.

Step 3. Click on Convert/Save at the bottom afterwards not the arrow next to it.
Step 4. Click on the Profile menu and select Audio > MP3 from the selection menu. You can also convert the video to Flac or Ogg Vorbis if you prefer those formats.
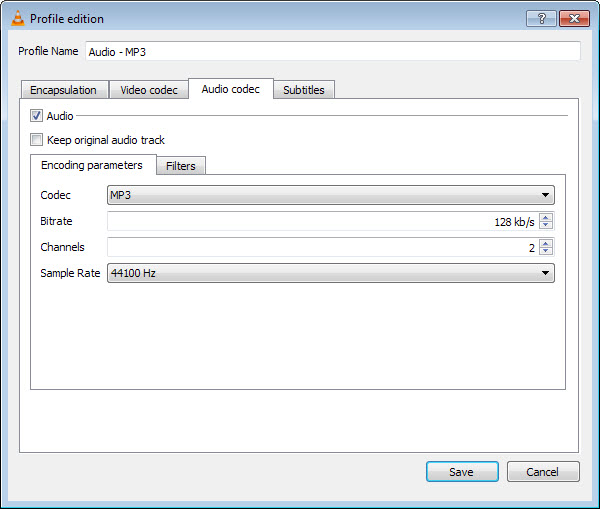
Step 5. Once you have selected the desired audio format, click on the settings icon next to the menu. Switch to audio codec here to change various output related settings. Here it is for instance possible to modify the bitrate or channels, or change the sample rate from the default 44100 Hz value to something else. Click save if you have made modifications on this screen.
Step 6. Click on browse next to destination file: browse to the folder you want to save the audio file to, and enter a name. Make sure it is unique as it will overwrite existing files if a file with the same name and extension exists already.
Step 7. Click on save once you are finished. Now select start and the conversion starts automatically. VLC will show the progress in the main interface and the new audio format will become available in the selected folder afterwards. Repeat the process for as many video files as you want to convert to audio.
Now play the MP3 audio file using mp3 players, smartpho nes, your computer and any other device.
Third Way- Using CloudConvert (Web-based)
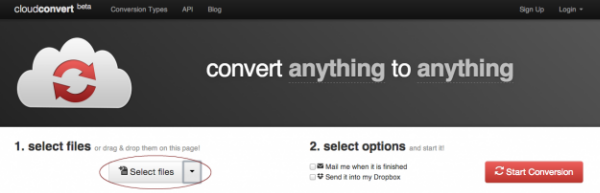
CloudConvert may still be in the public beta phase, but the intuitive cloud-based service is a standalone option that requires little more than an Internet connection and your file. It's entirely free, requires no additional software to run, and supports quick conversion between more than 100 formats — most notably MP4 to MP3 in our case. Afree account can only handle files less than 100 MB. However, it should suite your needs if you're files aren't overly large.
Step 1: Head over to the site
Navigate to the Cloud Convert website to utilize the software.
Step 2: Select MP4s
Click the Select files button and select the MP4 files you wish to convert to MP3. A pop-up window will appear where you can locate or search for the desired files on your computer. Once found, click the Open button in the lower right-hand corner to add the file to the conversion queue.
Select 3: Select output preferences
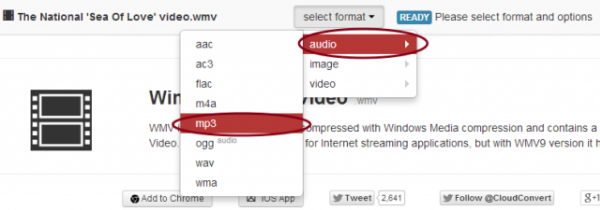
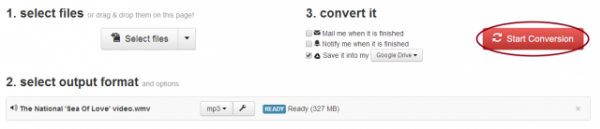
Click the Select format button that appears after adding MP4 to the list, then select audio and MP3 from the drop-down list. Click the wrench icon to the right of the file if you wish to fine tune the audio bit rate (up to 320 kbps), channels, frequency, normalization or trim the new file to a specified length — an incredibly handy tool if your video has an introduction or ending with undesired audio. Click the blue Okay button when finished.
Step 4: Select your saving options
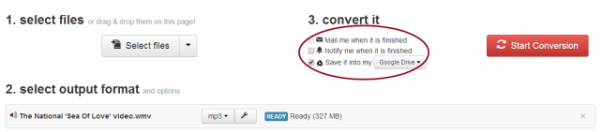
CloudConvert offers three additional saving options besides your typically download. Check the top box if you want the resulting MP3 emailed to a specified address after the conversion is complete or the bottom box if you want to send the file directly to your Dropbox or Google Drive account.
Step 5: Convert
Click the red Start Conversion button on the right-hand side when you've finished setting your desired output and saving preferences. A gray-and-yellow bar will appear at the top indicating the conversion's current status as well as cancellation button should change your mind for whatever reason. Afterward, wait for the conversion to complete.
Step 6: Download
It may take awhile, but CloudConvert will notify you when your MP4 to MP3 conversion is complete. Now just click the green Download button and select a save destination for the file. If you chose either of the two saving options in Step 4, the resulting MP3 should already be in your email inbox, Dropbox, or Google Drive account.
Summary
No matter which method you'd like to prefer, just get your amazing music from MP4 movies to enrich your leisure and scrap times by your players anytime!
Have more questions about how to extract audio from MP4 for enjoying on MP3 Player, please feel free to contact us>>
.Related Articles
4 thoughts on “How to extract audio from MP4 for enjoying on MP3 Player”
Leave a Reply
You must be logged in to post a comment.
Ultimate media solution to convert all SD, HD, 2K, 4K videos to play, edit, share on Windows 10.
Price: $45.95
With iFastime, the whole process of converting mp4 file is simplified so that even your dog and cats could do it lol. I love this product.
A really handy tool for video conversion.
I really appreciate your content. The article has really peaks my interest. I am going to bookmark your site and keep checking for new information.
I just purchased this app and I was so excited to use it. Finally, it does exactly as I needed it too, so 5 stars from me